http://robertdunaway.github.io
Angular2 code kata list
All code katas lists
![]()
001 Angular2 - getting started
Duration
15 minutes
Brief
This kata is more an explanation than a kata. You will learn the anatomy of the solution we are using for the Angular2 katas.
For more information
BING/GOOGLE: “Angular2 Getting Started”
Read eBook: https://www.ng-book.com/2/
Instructions
Get tutorial folder or the entire katas-angular2 repo.
Open the [before/*.sln] file and execute the kata.
Feel free to execute this kata multiple times because repetition creates motor memory.
Github
Kata
We already have an Angular2 project with TypeScript compilation with Gulp. Feel free to skip this kata if you’re not interested in how everything is set up.
Adding JavaScript libraries
We added the following libraries to the package.json file. These are recommended by Google but some can be swapped out for something you prefer. IE: SystemJS is a module loader. Other module loaders like WebPack are preferred by some and can be used instead.
    "angular2": "2.0.0-beta.0",
    "systemjs": "0.19.6",
    "es6-promise": "^3.0.2",
    "es6-shim": "^0.33.3",
    "reflect-metadata": "0.1.2",
    "rxjs": "5.0.0-beta.0",
    "zone.js": "0.5.10"
After adding these our package.json will look like this. It’s getting lengthy but does a lot for us. A few of these libraries might go away if we find we never use them.
{
  "version": "1.0.0",
  "name": "ASP.NET",
  "private": true,
  "devDependencies": {
    "angular2": "2.0.0-beta.0",
    "es6-promise": "^3.0.2",
    "es6-shim": "^0.33.3",
    "gulp": "^3.9.0",
    "gulp-clean": "^0.3.1",
    "gulp-livereload": "^3.8.1",
    "gulp-minify-html": "^1.0.5",
    "gulp-newer": "^1.1.0",
    "gulp-plumber": "^1.0.1",
    "gulp-rename": "^1.2.2",
    "gulp-sourcemaps": "^1.6.0",
    "gulp-tsd": "0.0.4",
    "gulp-tslint": "^4.3.0",
    "gulp-tslint-stylish": "^1.1.1",
    "gulp-typescript": "^2.10.0",
    "gulp-uglify": "^1.5.1",
    "gulp-watch": "^4.3.5",
    "merge": "^1.2.0",
    "reflect-metadata": "0.1.2",
    "reporters": "0.0.4",
    "run-sequence": "^1.1.5",
    "rxjs": "5.0.0-beta.0",
    "systemjs": "0.19.6",
    "zone.js": "0.5.10"
  }
}
Now that our libraries are installed we need to give access to the application at run time. To accomplish this, we will copy the libraries to the wwwroot folder with Gulp.
We added the following to our Gulp file so the libraries can be copied to wwwroot.
// for angular2
 , 'node_modules/**//es6-shim/es6-shim.min.js'
 , 'node_modules/**//angular2/bundles/angular2-polyfills.min.js'
 , 'node_modules/**//systemjs/dist/system.src.js'
 , 'node_modules/**//rxjs/bundles/rx.min.js'
 , 'node_modules/**//angular2/bundles/angular2.min.js'
The lib task in the gulpfile.json file should look like this:
gulp.task('libs', function () {
    return gulp.src(['bower_components/**//normalize-css/normalize.css'
                    , 'bower_components/**//font-awesome/css/font-awesome.min.css'
                    , 'bower_components/**/font-awesome/fonts/*.*'
                    , 'bower_components/**//jquery/dist/jquery.min.js'
                    , 'bower_components/**//lodash/lodash.min.js'

                    // for angular2
                    , 'node_modules/**//es6-shim/es6-shim.min.js'
                    , 'node_modules/**//angular2/bundles/angular2-polyfills.min.js'
                    , 'node_modules/**//systemjs/dist/system.src.js'
                    , 'node_modules/**//rxjs/bundles/rx.min.js'
                    , 'node_modules/**//angular2/bundles/angular2.min.js'

    ])
      .pipe(plumber({
          errorHandler: onError
      }))
      .pipe(gulp.dest('wwwroot/lib/./'));
});
We added references to the new libraries in the index.html file.
<script src="../lib/es6-shim/es6-shim.min.js"></script>
<script src="../lib/angular2/bundles/angular2-polyfills.min.js"></script>
<script src="../lib/systemjs/dist/system.src.js"></script>
<script src="../lib/rxjs/bundles/rx.min.js"></script>
<script src="../lib/angular2/bundles/angular2.min.js"></script>
Install the TSD for Angular2.
Type definitions found here.
http://definitelytyped.org/
The index.html file
Don’t be concerned about what you don’t understand at this point.
If you open the app.ts file, you’ll find the following.
import { bootstrap } from 'angular2/platform/browser';
import { Component } from 'angular2/core';

@Component({
    selector: 'hello-world',
    template: `
    <div>
        Hello World
    </div>
`
})

class HelloWorld { }

bootstrap(HelloWorld);
We’ve added our JavaScript libraries but one important file we did not add was our app.js file. With Angular2 there is no longer the concept of ng-app. Now we tell Angular what module to use as the applications entry point. We do this in the html file.
<script>
    System.config({
        packages: {
            app: {
                format: 'register',
                defaultExtension: 'js'
            }
        }
    });
    System.import('app.js')
          .then(null, console.error.bind(console));
</script>
We created a html component called hello-world and added it to the html page.
Tooling
We’ve set everything up but you might not have noticed there is not an actual app.js file. We need to have tooling to transpile the TypeScript file down to JavaScript. We use Gulp to create a development/build pipeline that does this and much more.
To support the TypeScript transpilation we have a tsconfig.json file.
To support the automatic update of the Definitely Typed system we created a gulp_tsd.json file. The gulpfile.js file has a task that uses this configuration file. This task, “tsd”, is bound to “Project Open” in Visual Studio.
{
  "command": "reinstall",
  "latest": true,
  "config": "./tsd.json",
  "opts": {
  }
}
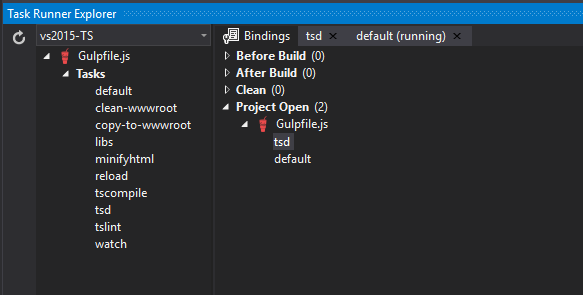
NOTE: This provides Visual Studio what it needs to provide intellisense.
Examples of commands to retrieve Definitely Typed definitions.
tsd query angular2 --action install –save
tsd query systemjs --action install --save
Gulp
Let’s walk through the Gulp implementation.
Visual Studio 2015, by default, serves pages out of the wwwroot folder. This is where our files need to end up. You can consider this the destination folder.
Our source code will be in the src folder.
The Gulp file performs the following tasks and in this order.
- clean-wwwroot – Clean out the
wwwrootfolder. This gives us a clean slate. - copy-to-wwwroot – All the code from the
srcfolder is copied to thewwwrootfolder. - libs – copies all library files, we need at run-time, to the libs folder in
wwwroot. - minifyhtml – optimizes any html file in
wwwrootfolder. - tscompile – transpiles all TypeScript files down to JavaScript and provides a map allowing us to use TypeScript for debugging in the browser.
- tslint – provides TypeScript guidance.
- watch – provides a group of file watchers. When changes occur the files are re-optimized and put in
wwwroot. - reload – provides live reload capabilities.
- NOTE: To get live reload working you must install the Chrome addin for livereload. This feature only works in Chrome.
- https://chrome.google.com/webstore/detail/livereload/jnihajbhpnppcggbcgedagnkighmdlei?hl=en
When source files are changed they are copied to the wwwroot folder and optimized then the browser is refreshed without you doing anything more than saving the file. All of this happens quickly.
You should have a pretty good understanding of how this solution works. It’s a good starting point for any project so feel free to copy/paste the solution and start building your own applications.
![]()


0 comments:
Post a Comment