• Search form is empty!

  • http://robertdunaway.github.io

    Angular2 code kata list

    All code katas lists

    Smiley face

    005 Angular2 - adding bootstrap

    Duration

    15 minutes

    Brief

    Set up ng2-bootstrap and twitter bootstrap 4.

    For more information

    BING/GOOGLE: “Angular2 ng2-bootstrap”
    Read eBook: https://www.ng-book.com/2/

    Instructions

    Get tutorial folder or the entire katas-angular2 repo.
    Open the [before/*.sln] file and execute the kata.
    Feel free to execute this kata multiple times because repetition creates motor memory.

    Github

    Kata

    In this kata we will add twitter-bootstrap 4 to our Angular 2 application. At the time of this kata twitter-bootstrap 4 is in alpha.

    Also, no blessed version of Angular 2 bootstrap integration has surfaced.

    Try to implement bootstrap in the Angular 2 application.

    Review

    Here is where you get bootstrap 4.

    http://v4-alpha.getbootstrap.com/

    The css is required but not the JavaScript because we’ll be using
    ng2-bootstrap.

    ng2-bootstrap

    For the JavaScript portion of bootstrap we are using the valor-software.com implementation of bootstrap for Angular 2. There are other implementations and in fact you can use bootstraps JavaScript implementation of bootstrap.

    The reason some will prefer an Angular 2 implementation is because they might prefer declarative programming with Angular directives as opposed to imperative programming in the jQuery style. As far as I know this is personal preference but the “right” way to do it is the Angular way… So I’m told.

    http://valor-software.com/ng2-bootstrap/index-bs4.html

    Install NPM packages

    
    npm install ng2-bootstap --save-dev
    npm install bootstrap@4.0.0-alpha.2 --save-dev


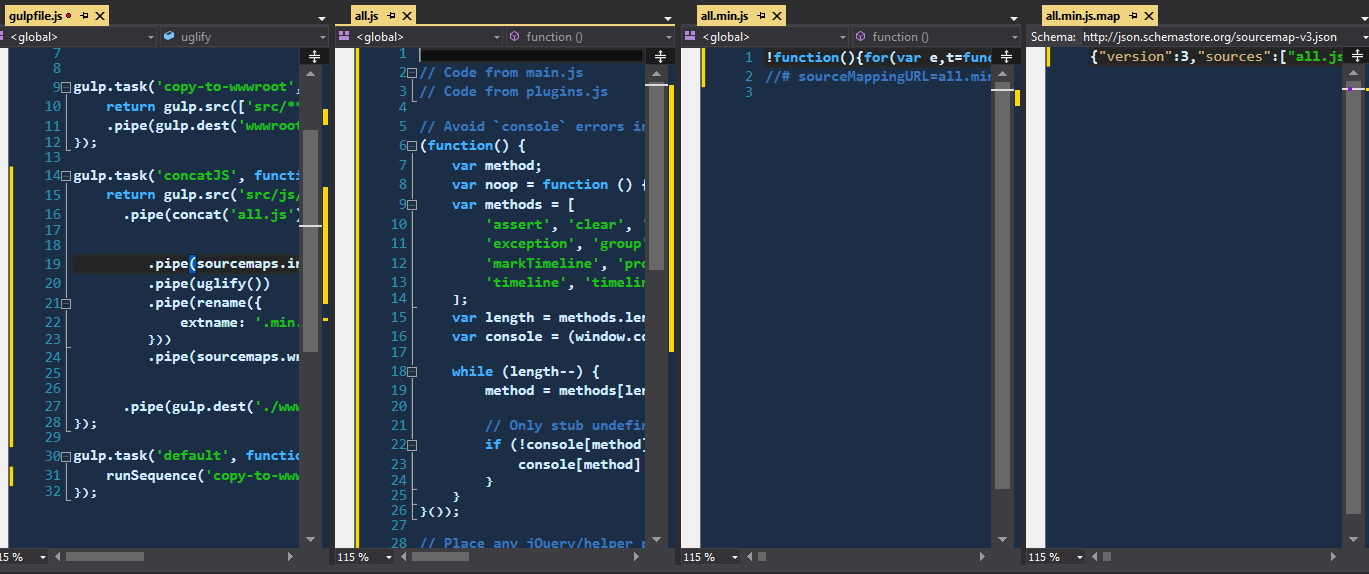
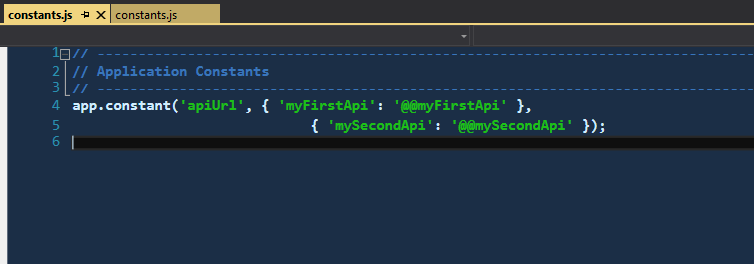
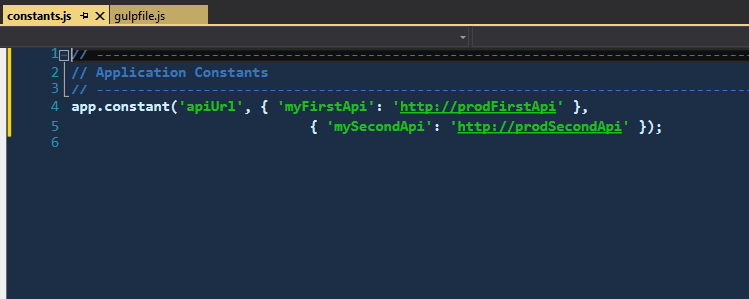
    Add the required files to out gulp task, libs, to copy to wwwroot.

    
    , 'node_modules/**//bootstrap/dist/css/bootstrap.min.css'
    , 'node_modules/**//ng2-bootstrap/bundles/ng2-bootstrap.min.js'


    Add references to the index.html file.

    
    <link href="../lib/bootstrap/dist/css/bootstrap.min.css" rel="stylesheet" />
    <script src="../lib/ng2-bootstrap/bundles/ng2-bootstrap.min.js"></script>


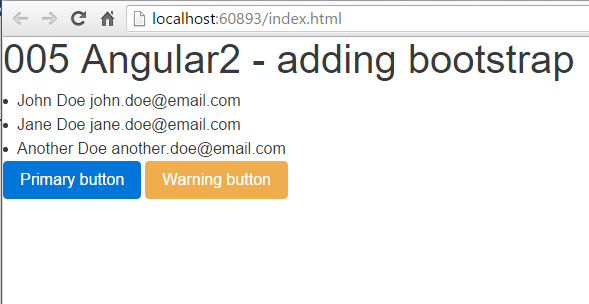
    Running the application, we can already see some changes. You’ll notice the font is different and some spacing has changed.

    The top is before and the bottom is after.


    Let’s go ahead and add a couple controls to make sure things work.

    Add a calendar control

    This requires moment.js so we’ll need to add this npm package.

    
    npm install moment --save-dev


    Update the lib task to copy moment.js to wwwroot.

    
    , 'node_modules/**//moment/min/moment.min.js'


    Add moment.js to type definition.

    
    tsd query moment


    NOTE: If the typings command doesn’t work you might not have it
    installed. If this is the case then execute the following command and
    try again.


    npm install tsd -g


    To make the TypeScript transpiler happy add this reference to the top of your ts page.

    
    /// <reference path="../typings/browser/definitions/moment/moment.d.ts" />


    NOTE: ng1-bootstrap depends on moment.js but because moment.js object
    lives window in the browser there is no need to import it.

    Update the system.js config in index.html.

    
            System.config({
                packages: {
                    app: {
                        format: 'register',
                        defaultExtension: 'js'
                    }
                },
                map: {
                    moment: '../lib/moment/min/moment.min.js'
                }
            });
            System.import('app.js')
                  .then(null, console.error.bind(console));


    We’ve seen the font change. Let’s add a couple buttons to the screen.

    
    <button type="button" class="btn btn-primary" >
        Primary button
    </button>
    
    <button type="button" class="btn btn-warning">
        Warning button
    </button>


    Next

    Take a few minutes and imagine more examples.


    Smiley face

    http://robertdunaway.github.io

    Gulp code kata list

    All code katas lists

    Smiley face

    027 Gulp -reload

    Duration

    10 minutes

    Brief

    Add an automatic browser refresh to improve productivity.

    For more information

    BING/GOOGLE: “Gulp live reload”

    Book:
    Gulp - Quick guide to getting up and running today

    Smiley face

    Instructions

    Get tutorial folder or the entire katas-Gulp repo.
    Open the [before/*.sln] file and execute the kata.
    Feel free to execute this kata multiple times because repetition creates motor memory.

    Github

    Kata

    Using gulp-livereload configure Gulp to automatically reload the browser when an HTML or JavaScript file is changed.

    We are starting off with a fully functional gulpfile.js. The only thing left to do is configure the browser reload.

    NOTE: This is an Angular2 solution.

    Review

    Add the required NPM packages.

    
    npm install gulp-livereload --save-dev


    Add the module reference.

    
    , livereload = require('gulp-livereload')


    Create the reload task.

    
    gulp.task('reload', function () {
        // Change the filepath, when you want to live reload a different page in your project.
        livereload.reload("./index.min.html");
    });


    Add the livereload listener to the watch task.

    
    gulp.task('watch', function () {
    
        livereload.listen();


    Install the Chrome plugin that makes livereload possible.
    https://chrome.google.com/webstore/detail/livereload/jnihajbhpnppcggbcgedagnkighmdlei?hl=en


    Add the reload task to each of the existing watch commands inside the watch task. Don’t add it to the copy-to-wwwroot watch task.

    
        // ---------------------------------------------------------------
        // Watching TypeScript files
        // ---------------------------------------------------------------
        gulp.watch(['wwwroot/**/*.ts', '!wwwroot/lib/**/*.*', '!wwwroot/css/**/*.*'], function () { runSequence('tscompile', 'reload'); });
    
        // ---------------------------------------------------------------
        // Watch - Execute linters
        // ---------------------------------------------------------------
        gulp.watch(['wwwroot/**/*.ts', '!wwwroot/lib/**/*.*', '!wwwroot/css/**/*.*'], function () { runSequence('tslint', 'reload'); });
    
        // ---------------------------------------------------------------
        // Watching HTML files
        // ---------------------------------------------------------------
        gulp.watch(['wwwroot/**/*.html', '!wwwroot/**/*.min.html', '!wwwroot/lib/**/*'], function () { runSequence('minifyhtml', 'reload'); });


    Now run the site and in the Chrome browser press the “Enable LiveReload” button.


    Make changes to the files in src/ and you’ll see the changes reflected in the browser.

    Next

    Take a few minutes and imagine more examples.


    Smiley face

    http://robertdunaway.github.io

    Angular2 code kata list

    All code katas lists

    Smiley face

    028 Gulp - setting up angular2

    Duration

    15 minutes

    Brief

    This kata is more an explanation than a kata. You will how to set up Gulp to ease development with automated tasks.

    For more information

    BING/GOOGLE: “Gulp Angular2”

    Read eBook: https://www.ng-book.com/2/

    Instructions

    Get tutorial folder or the entire katas-gulp repo.
    Open the [before/*.sln] file and execute the kata.
    Feel free to execute this kata multiple times because repetition creates motor memory.

    Github

    https://github.com/robertdunaway/katas-gulp/tree/master/028%20Gulp%20-%20setting%20up%20angular2/afterKata

    Kata

    We already have an Angular2 project with TypeScript compilation with Gulp. Feel free to skip this kata if you’re not interested in how everything is set up.

    Adding JavaScript libraries

    We added the following libraries to the package.json file. These are recommended by Google but some can be swapped out for something you prefer. IE: SystemJS is a module loader. Other module loaders like WebPack are preferred by some and can be used instead.


        "angular2": "2.0.0-beta.0",
        "systemjs": "0.19.6",
        "es6-promise": "^3.0.2",
        "es6-shim": "^0.33.3",
        "reflect-metadata": "0.1.2",
        "rxjs": "5.0.0-beta.0",
        "zone.js": "0.5.10"


    After adding these our package.json will look like this. It’s getting lengthy but does a lot for us. A few of these libraries might go away if we find we never use them.


    {
      "version": "1.0.0",
      "name": "ASP.NET",
      "private": true,
      "devDependencies": {
        "angular2": "2.0.0-beta.0",
        "es6-promise": "^3.0.2",
        "es6-shim": "^0.33.3",
        "gulp": "^3.9.0",
        "gulp-clean": "^0.3.1",
        "gulp-livereload": "^3.8.1",
        "gulp-minify-html": "^1.0.5",
        "gulp-newer": "^1.1.0",
        "gulp-plumber": "^1.0.1",
        "gulp-rename": "^1.2.2",
        "gulp-sourcemaps": "^1.6.0",
        "gulp-tsd": "0.0.4",
        "gulp-tslint": "^4.3.0",
        "gulp-tslint-stylish": "^1.1.1",
        "gulp-typescript": "^2.10.0",
        "gulp-uglify": "^1.5.1",
        "gulp-watch": "^4.3.5",
        "merge": "^1.2.0",
        "reflect-metadata": "0.1.2",
        "reporters": "0.0.4",
        "run-sequence": "^1.1.5",
        "rxjs": "5.0.0-beta.0",
        "systemjs": "0.19.6",
        "zone.js": "0.5.10"
      }
    }


    Now that our libraries are installed we need to give access to the application at run time. To accomplish this, we will copy the libraries to the wwwroot folder with Gulp.

    We added the following to our Gulp file so the libraries can be copied to wwwroot.


    // for angular2
     , 'node_modules/**//es6-shim/es6-shim.min.js'
     , 'node_modules/**//angular2/bundles/angular2-polyfills.min.js'
     , 'node_modules/**//systemjs/dist/system.src.js'
     , 'node_modules/**//rxjs/bundles/rx.min.js'
     , 'node_modules/**//angular2/bundles/angular2.min.js'


    The lib task in the gulpfile.json file should look like this:


    gulp.task('libs', function () {
        return gulp.src(['bower_components/**//normalize-css/normalize.css'
                        , 'bower_components/**//font-awesome/css/font-awesome.min.css'
                        , 'bower_components/**/font-awesome/fonts/*.*'
                        , 'bower_components/**//jquery/dist/jquery.min.js'
                        , 'bower_components/**//lodash/lodash.min.js'
    
                        // for angular2
                        , 'node_modules/**//es6-shim/es6-shim.min.js'
                        , 'node_modules/**//angular2/bundles/angular2-polyfills.min.js'
                        , 'node_modules/**//systemjs/dist/system.src.js'
                        , 'node_modules/**//rxjs/bundles/rx.min.js'
                        , 'node_modules/**//angular2/bundles/angular2.min.js'
    
        ])
          .pipe(plumber({
              errorHandler: onError
          }))
          .pipe(gulp.dest('wwwroot/lib/./'));
    });


    We added references to the new libraries in the index.html file.


    <script src="../lib/es6-shim/es6-shim.min.js"></script>
    <script src="../lib/angular2/bundles/angular2-polyfills.min.js"></script>
    <script src="../lib/systemjs/dist/system.src.js"></script>
    <script src="../lib/rxjs/bundles/rx.min.js"></script>
    <script src="../lib/angular2/bundles/angular2.min.js"></script>


    Install the TSD for Angular2.

    Type definitions found here.
    http://definitelytyped.org/

    The index.html file

    Don’t be concerned about what you don’t understand at this point.
    If you open the app.ts file, you’ll find the following.


    import { bootstrap } from 'angular2/platform/browser';
    import { Component } from 'angular2/core';
    
    @Component({
        selector: 'hello-world',
        template: `
        <div>
            Hello World
        </div>
    `
    })
    
    class HelloWorld { }
    
    bootstrap(HelloWorld);


    We’ve added our JavaScript libraries but one important file we did not add was our app.js file. With Angular2 there is no longer the concept of ng-app. Now we tell Angular what module to use as the applications entry point. We do this in the html file.


    <script>
        System.config({
            packages: {
                app: {
                    format: 'register',
                    defaultExtension: 'js'
                }
            }
        });
        System.import('app.js')
              .then(null, console.error.bind(console));
    </script>


    We created a html component called hello-world and added it to the html page.


    Tooling

    We’ve set everything up but you might not have noticed there is not an actual app.js file. We need to have tooling to transpile the TypeScript file down to JavaScript. We use Gulp to create a development/build pipeline that does this and much more.

    To support the TypeScript transpilation we have a tsconfig.json file.

    To support the automatic update of the Definitely Typed system we created a gulp_tsd.json file. The gulpfile.js file has a task that uses this configuration file. This task, “tsd”, is bound to “Project Open” in Visual Studio.

    
    {
      "command": "reinstall",
      "latest": true,
      "config": "./tsd.json",
      "opts": {
      }
    }


    NOTE: This provides Visual Studio what it needs to provide intellisense.

    Examples of commands to retrieve Definitely Typed definitions.

    
    tsd query angular2 --action install –save
    tsd query systemjs --action install --save


    Gulp

    Let’s walk through the Gulp implementation.

    Visual Studio 2015, by default, serves pages out of the wwwroot folder. This is where our files need to end up. You can consider this the destination folder.

    Our source code will be in the src folder.

    The Gulp file performs the following tasks and in this order.

    - clean-wwwroot – Clean out the wwwroot folder. This gives us a clean slate.
    - copy-to-wwwroot – All the code from the src folder is copied to the wwwroot folder.
    - libs – copies all library files, we need at run-time, to the libs folder in wwwroot.
    - minifyhtml – optimizes any html file in wwwroot folder.
    - tscompile – transpiles all TypeScript files down to JavaScript and provides a map allowing us to use TypeScript for debugging in the browser.
    - tslint – provides TypeScript guidance.
    - watch – provides a group of file watchers. When changes occur the files are re-optimized and put in wwwroot.
    - reload – provides live reload capabilities.

    NOTE: To get live reload working you must install the Chrome addin for
    livereload. This feature only works in Chrome.


    When source files are changed they are copied to the wwwroot folder and optimized then the browser is refreshed without you doing anything more than saving the file. All of this happens quickly.

    You should have a pretty good understanding of how this solution works. It’s a good starting point for any project so feel free to copy/paste the solution and start building your own applications.


    Smiley face

    http://robertdunaway.github.io

    Gulp code kata list

    All code katas lists

    Smiley face

    026 Gulp - running grunt tasks

    Duration

    10 minutes

    Brief

    Execute a Grunt task with Gulp.

    For more information

    Execute a Grunt task with Gulp.

    Book:
    Gulp - Quick guide to getting up and running today

    Smiley face

    Instructions

    Get tutorial folder or the entire katas-Gulp repo.
    Open the [before/*.sln] file and execute the kata.
    Feel free to execute this kata multiple times because repetition creates motor memory.

    Github

    Kata

    On occasion you might need to combine JSON files.

    In this case we are combining multiple JSON files that represent menu items. A suitable gulp plugin is not available but there is a Grunt task that does what we need.

    In this task you will perform a JSON merge on all JSON files in the config folder with grunt-merge-json.

    Review

    Installed the require NPM packages.

    
    npm install grunt-merge-json --save-dev
    npm install gulp-grunt --save-dev


    Install the Grunt command line interface.

    
    npm install -g grunt-cli


    Create a gruntfile.js, in the root, to support the Grunt task.

    
    module.exports = function (grunt) {
    
        grunt.initConfig({
            distFolder: 'wwwroot/config',
    
            pkg: grunt.file.readJSON('package.json'),
            "merge-json": {
    
                menu: {
                    src: ['src/config/*.json.txt'],
                    dest: 'wwwroot/config/menu.json',
                },
            },
        });
    
        // Load modules, register tasks
        grunt.loadNpmTasks('grunt-merge-json');
    };


    To tie everything together add this task to the Gulp file.

    
    // -------------------------------------------------
    // Grunt configuration
    require('gulp-grunt')(gulp, {
        // These are the default options but included here for readability.
        base: null,
        prefix: 'grunt-',
        verbose: false
    });
    // -------------------------------------------------


    Update the default task.

    
    gulp.task('default', function () {
        runSequence('copy-to-wwwroot', 'grunt-merge-json:menu');
    });


    After running the default task you should have a new JSON menu file that looks like this.

    
    {
        "0": {
            "name": "Applications",
            "id": "catApps",
            "isOpen": "true",
            "icon": " fa-power-off ",
            "session": "coreSession",
            "role": "MashupUser",
            "groups": [
                {
                    "name": "app1",
                    "id": "menuItemApp1",
                    "desc": "Application 1, page 1.",
                    "url": "/app1/page1",
                    "icon": " fa-bar-chart ",
                    "session": "coreSession",
                    "role": "MashupUser"
                },
                {
                    "name": "app2",
                    "id": "menuItemApp2",
                    "desc": "Application 2, page 3.",
                    "url": "/app2/page3",
                    "icon": " fa-laptop ",
                    "session": "coreSession",
                    "role": "MashupUser"
                }
            ]
        },
        "1": {
            "name": "Utilities",
            "id": "catUtilities",
            "isOpen": "false",
            "icon": " fa-cogs ",
            "session": "coreSession",
            "role": "MashupUser",
            "groups": []
        },
        "2": {
            "name": "Administrative",
            "id": "catAdmin",
            "isOpen": "false",
            "icon": " fa-users",
            "session": "coreSession",
            "role": "MashupUser",
            "groups": []
        },
        "3": {
            "name": "Examples",
            "id": "catExamples",
            "isOpen": "false",
            "icon": " fa-file-code-o ",
            "session": "coreSession",
            "role": "MashupUser",
            "groups": []
        }
    }


    Next

    Take a few minutes and imagine more examples.


    Smiley face

    http://robertdunaway.github.io

    Gulp code kata list

    All code katas lists

    Smiley face

    025 Gulp - concat

    Duration

    5 minutes

    Brief

    In this kata we will combine multiple files into one.

    For more information

    BING/GOOGLE: “Gulp concat minify javascript”

    Book:
    Gulp - Quick guide to getting up and running today

    Smiley face

    Instructions

    Get tutorial folder or the entire katas-Gulp repo.
    Open the [before/*.sln] file and execute the kata.
    Feel free to execute this kata multiple times because repetition creates motor memory.

    Github

    Kata

    Bundle all the JavaScript files, in src, and output them into a single file named all.js. Then minify the all.js file and output all.min.js.

    Review

    Install the NPM modules needed.

    
    npm install gulp-concat --save-dev
    npm install gulp-uglify --save-dev


    Add the references to the gulp file.

    
    , concat = require('gulp-concat')
    , uglify = require('gulp-uglify')


    Create a task to concatenate, minify, and map all JavaScript files in the src/js folder.

    
    gulp.task('concatJS', function () {
        return gulp.src('src/js/**/*')
          .pipe(concat('all.js'))
    
    
             .pipe(sourcemaps.init())
             .pipe(uglify())
             .pipe(rename({
                 extname: '.min.js'
             }))
             .pipe(sourcemaps.write('./'))
    
    
          .pipe(gulp.dest('./wwwroot/js/'));
    });
    
    gulp.task('default', function () {
        runSequence('copy-to-wwwroot', 'concatJS');
    });


    Just seems like a good place to insert an image.

    Next

    Take a few minutes and imagine more examples.


    Smiley face

    http://robertdunaway.github.io

    Gulp code kata list

    All code katas lists

    Smiley face

    024 Gulp - replace & passing params

    Duration

    15 minutes

    Brief

    In this kata we will rename constant values based on configuration files and parameters passed in.

    For more information

    BING/GOOGLE: “Gulp ”

    Book:
    Gulp - Quick guide to getting up and running today

    Smiley face

    Instructions

    Get tutorial folder or the entire katas-Gulp repo.
    Open the [before/*.sln] file and execute the kata.
    Feel free to execute this kata multiple times because repetition creates motor memory.

    Github

    Kata

    Most applications are expected to function in multiple environments. When coding you expect the application to function in the local environment. When you deploy to the test environment you expect it to function there and the same for production.

    In this kata we will rename constant values based on configuration files and parameters passed in.

    You have constant values in src/js/comstants.js. Change the values for @@myFirstApi and @@mySecondApi. Create three sets of config files. One for dev, stage and prod. You’re going to use the parameter --env and follow that with the environment you intend your build to be fore.

    Example you will be able to use these gulp commands.

    
    gulp --env-dev


    or

    
    gulp --env-prod


    Review

    Install the needed NPM packages.

    
    npm install gulp-replace-task --save-dev
    npm install yargs --save-dev


    gulp-replace-task: Enables us to find and replace variables identified with “@@”.

    yargs: Enables the use of command line parameters.

    fs: Enables the ability to load local files.


    Add references to the new modules to the gulpfile.

    
    , replace               = require('gulp-replace-task')
    , args                  = require('yargs').argv
    , fs                    = require('fs')


    Create three config files in the src/config folder, for each environment.

    env.config.dev.json
    

    Create this file with the following content.

    
    { 
        "myFirstApi":  "http://devFirstApi",
        "mySecondApi":  "http://devSecondApi"
    }


    env.config.stage.json
    

    Create this file with the following content.

    
    { 
        "myFirstApi":  "http://stageFirstApi",
        "mySecondApi":  "http://stageSecondApi"
    }


    env.config.prod.json
    

    Create this file with the following content.

    
    { 
        "myFirstApi":  "http://prodFirstApi",
        "mySecondApi":  "http://prodSecondApi"
    }


    Create the setEnv task and update the default task to run it after src is copied.

    
    gulp.task('setEnv', function () {
        // Get the environment from the command line
        var env = args.env || 'dev';
    
        // Read the settings from the right file
        var filename = 'env.config.' + env + '.json';
        var settings = JSON.parse(fs.readFileSync('src/config/' + filename, 'utf8'));
    
        // Replace each placeholder with the correct value for the variable.  
        gulp.src('src/js/constants.js')
          .pipe(replace({
              patterns: [
                {
                    match: 'myFirstApi',
                    replacement: settings.myFirstApi
                },
                {
                    match: 'mySecondApi',
                    replacement: settings.mySecondApi
                },
              ]
          }))
          .pipe(gulp.dest('wwwroot/js/'));
    });
    
    gulp.task('default', function () {
        runSequence('copy-to-wwwroot', 'setEnv');
    });


    Executing the new task

    The default parameter is dev so if you pass no parameters then the env.config.dev.json file is used.

    Here is the command-line syntax for updating the files with production values.

    
    gulp --env prod


    I’m not sure how to execute this in Visual Studio so for now you need to do this from the command line in the root folder of the solution. Visual Studio will likely develop the ability to pass parameters.


    Before


    After

    Next

    Take a few minutes and imagine more examples.


    Smiley face