• Search form is empty!

  • Showing posts with label router. Show all posts
    Showing posts with label router. Show all posts

    http://robertdunaway.github.io

    http://mashupjs.github.io

    The Mashup is a learning tool that serves as a seed project for line-of-business applications. It’s goal is a shortened learning curve for building modern business applications and the reduction of technical debt.
    Smiley face

    This tutorial and more can be found in

    Gulp - Quick guide to getting up and running today

    Gulp Tutorial - Part 5

    Handling Errors with Plumber


    From the command-line install

    npm install gulp-plumber --save-dev


    Add the module to the Gulp file

    , plumber = require('gulp-plumber');


    Add this to the top of your script file. Our plumber will use this function for logging errors to the console.


    var onError = function(err) {
        console.log(err);
    };


    Here is what a task might look like with the plumber() function.
    (Don’t add this code)


    // ---------------------------------------------------------------
    // Watch specific tasks.  This is to support the use of newer.
    // ---------------------------------------------------------------
    gulp.task('watch:annotate', function () {
        return gulp.src(['src/index.controller.js', 'src/core/**/*.js', 'src/apps/**/*.js', '!src/core/lib/**/*', '!/**/*.min.js'], { base: 'src/./' })
          .pipe(plumber({
            errorHandler: onError
          })) 
          .pipe(newer('src/./'))
          .pipe(ngAnnotate())
          .pipe(gulp.dest('src/./'));
    });


    The following tutorials will implement this plumber function with each task we create.


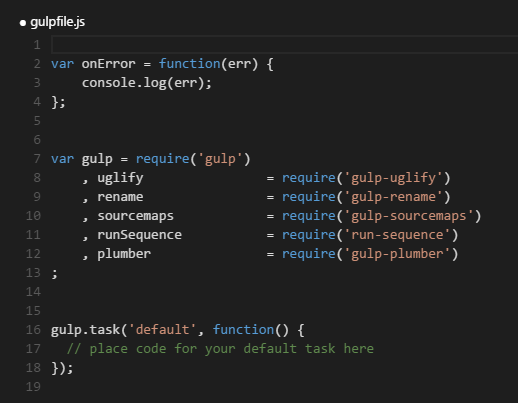
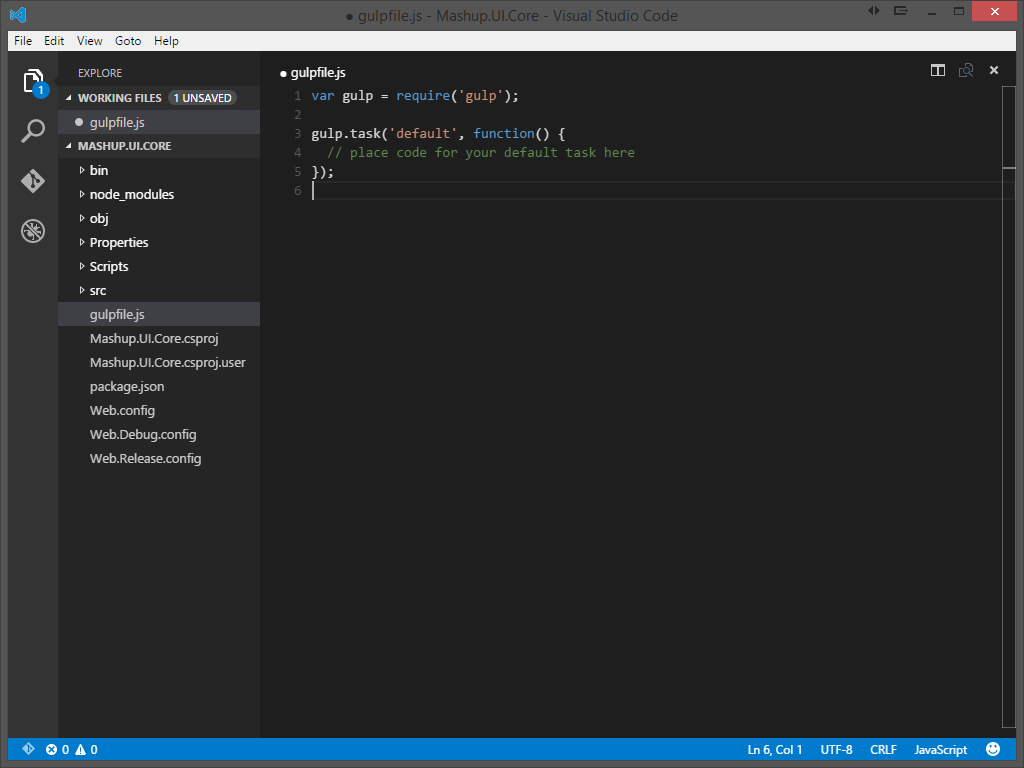
    Currently, your gulpfile.js should look like this:

    enter image description here


    Source code for this tutorial

    Start the tutorial using this code base:

    https://github.com/MashupJS/gulp-tutorial


    A completed tutorial can be found here:

    https://github.com/MashupJS/gulp-tutorial-end-result


    Smiley face

    This tutorial and more can be found in
    Gulp - Quick guide to getting up and running today

    http://robertdunaway.github.io

    http://mashupjs.github.io

    The Mashup is a learning tool that serves as a seed project for line-of-business applications. It’s goal is a shortened learning curve for building modern business applications and the reduction of technical debt.

    Smiley face

    This tutorial and more can be found in
    Gulp - Quick guide to getting up and running today

    Gulp Tutorial - Part 4

    Sequence and Parallel Task Processing

    The ability to execute Gulp tasks in sequence and parallel is still a moving target. By default, Gulp leans toward executing all tasks in parallel because that is the more performant approach.


    The option I chose was “run-sequence”. I chose this after battling with the other options. The Gulp 4 release should resolve many of the issues I struggled with.


    We have not yet created tasks but in preparation, install this plug-in.


    From the command-line install

    npm install run-sequence --save-dev

    Add the module to the gulp file

    , runSequence = require('run-sequence')


    All tasks created in this tutorial will have no other dependencies except the tasks we execute via the Gulp default task. The runSequence function will manage our dependencies. Creating dependencies is a simple option provided by Gulp but this causes tight coupling between tasks.


    For instance, before optimizing files, we will clean out the distribution folder and then copy optimized files back to it. During development, however, cleaning the distribution folder breaks when all files are not copied and optimized back to it. An attempt to copy and optimize every file would cause a delay during development.


    To resolve this, we will not tightly couple tasks, allowing all tasks to be executed when Gulp is run, but only the changes files are executed against when watching files during development.


    Another example where sequence matters is how JavaScript is optimized. Some JavaScript is found in .js files while other JavaScript is found after the compilation of TypeScript down to JavaScript. To minify and optimize JavaScript effectively, it’s better to perform the JavaScript Uglify after the .ts, TypeScript, files have been transpiled. So a dependency exists between TypeScript and JavaScript.


    We can accomplish this with runSequence().


    Here is what a default task might look like when using the runSequence function to manage tasks.
    (Don’t add this code)


    gulp.task('default', function() { runSequence('clean-dist',
                                      'annotate',
                                      'copy',
                                      ['coreservices', 'routeconfig', 'sass', 'tscompile', 'libs', 'grunt-merge-json:menu', 
                                          'tslint', 'jshint', 'minifyhtml', 'minifyimage'],
                                      ['uglifyalljs', 'minifycss'],
                                      'watch'
                                              );
    });

    Here is the sequence of execution

    1 clean-dist

    2 annotate

    3 copy

    4 (run in parallel) coreservices, routeconfig, sass, tscompile, libs, grunt-merge-json:menu, tslint, jshint, minifyhtml, minifyimage

    5 uglifyalljs, minifycss

    6 watch

    These are all tasks you will have created by the end of this multi-part tutorial.

    Optimizing task performance

    Notice the number of tasks executed in step 4. The more tasks you can run in parallel, the faster your process will be. It’s important to optimize your process as much as possible so you can change a piece of code and immediately execute the optimized version without delay.

    Other options

    Gulp 4.0 will have new methods series() and parallel(). This will be the preferred approach once released.


    Orchestrator – is an NPM module that supports series and parallel processing.


    Source code for this tutorial

    Start the tutorial using this code base:

    https://github.com/MashupJS/gulp-tutorial


    A completed tutorial can be found here:

    https://github.com/MashupJS/gulp-tutorial-end-result


    Smiley face

    This tutorial and more can be found in
    Gulp - Quick guide to getting up and running today

    http://robertdunaway.github.io

    http://mashupjs.github.io

    The Mashup is a learning tool that serves as a seed project for line-of-business applications. It’s goal is a shortened learning curve for building modern business applications and the reduction of technical debt.

    Smiley face

    This tutorial and more can be found in
    Gulp - Quick guide to getting up and running today

    Gulp Tutorial - Part 3

    Adding Plugins

    Plugins provide function to the task runner.

    Tip: When searching for plugins, consider the number of downloads the module has on NPM and activity on Github. These are indicators of how active the community is and how much support you can expect. You might find a dozen JavaScript minifiers. Choose the one with the most downloads and most recent activity on Github.


    You can search for plugins here
    http://gulpjs.com/plugins


    Once you’ve found a plugin, navigate to the plugins page. Here you’ll find general information on how to use the plugin and usually a couple examples to get you started.


    enter image description here


    Install a few useful plugins from the commandline of the root of your project. Notice “--save-dev”. This option includes the plugin in the package.json file.


    You’ve already installed Gulp.

    npm install gulp --save-dev


    Go ahead and install a couple more. (Just for fun)

    npm install gulp-uglify --save-dev
    npm install gulp-rename --save-dev
    npm install gulp-sourcemaps --save-dev


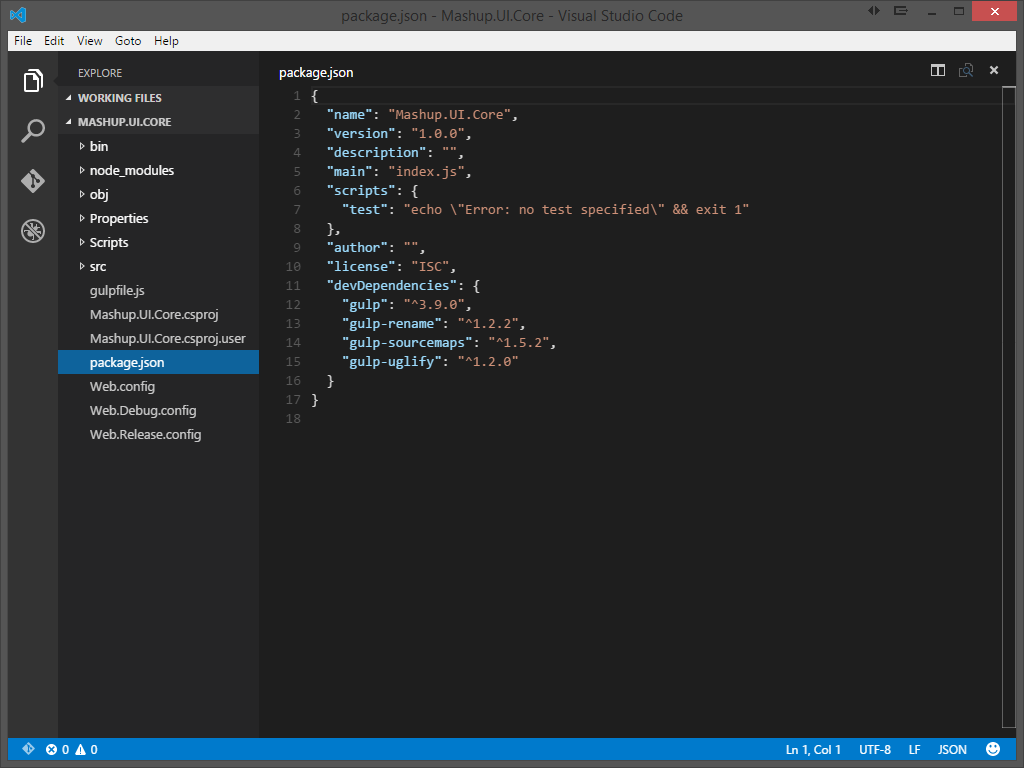
    Viewing the package.json with VSC, you’ll notice the new plugin configurations are saved.


    enter image description here


    To add these plugins to your gulp implementation, add the new plugins to your gulpfile.js.

    var gulp = require('gulp')
        , uglify                = require('gulp-uglify')
        , rename                = require('gulp-rename')
        , sourcemaps            = require('gulp-sourcemaps')
    ;
    gulp.task('default', function() {
      // place code for your default task here
    });

    Syntax for creating a task

    Gulp.task([task-name], function() {
        Return gulp.src([glob-array]
            .pipe([your-plugin])
            .pipe([another-plugin])
            .pipe(gulp.dest(dist));
    });

    Notice the “function” keyword. One of the more significant differences between Gulp and Grunt is configuration versus code. Gulp subscribes to a “code” approach while Grunt subscribes to “configuration”.


    Source code for this tutorial

    Start the tutorial using this code base:

    https://github.com/MashupJS/gulp-tutorial


    A completed tutorial can be found here:

    https://github.com/MashupJS/gulp-tutorial-end-result


    Smiley face

    This tutorial and more can be found in

    Gulp - Quick guide to getting up and running today

    http://robertdunaway.github.io

    http://mashupjs.github.io

    The Mashup is a learning tool that serves as a seed project for line-of-business applications. It’s goal is a shortened learning curve for building modern business applications and the reduction of technical debt.

    Smiley face

    This tutorial and more can be found in
    Gulp - Quick guide to getting up and running today

    Gulp Tutorial - Part 2

    Setup

    Here we need to install NodeJS, pull our tutorial project from GitHub, create our NPM package configuration file, and install Gulp both globally and locally.


    Installing NodeJS

    Download and install NodeJS.
    https://nodejs.org/


    Get tutorial project from GitHub

    Code for this tutorial can be found at
    https://github.com/MashupJS/gulp-tutorial


    On the GitHub repo page you’ll see an option to “Download ZIP”.

    Download the ZIP file and extract it where you can work with it.

    To see the end result, go to this repository.
    https://github.com/MashupJS/gulp-tutorial-end-result

    Setup the NPM Project Configuration File

    NPM packages are defined in the package.json file.

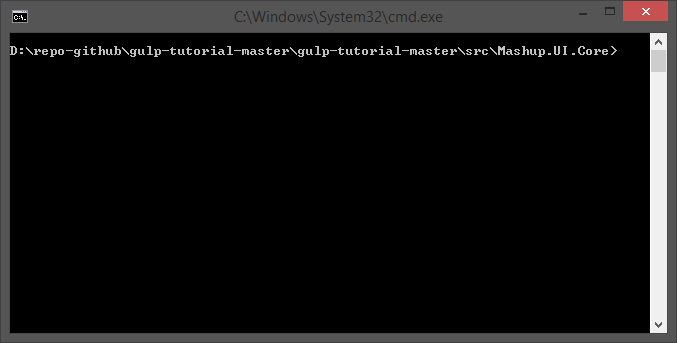
    To create a package.json file, open a command prompt in the root of your client folder.

    For this tutorial, open a command line to the Mashup.UI.Core folder.

    enter image description here

    At the command-line type

    npm init


    An empty package.json is created. Now we can begin installing NPM packages for use by Gulp.

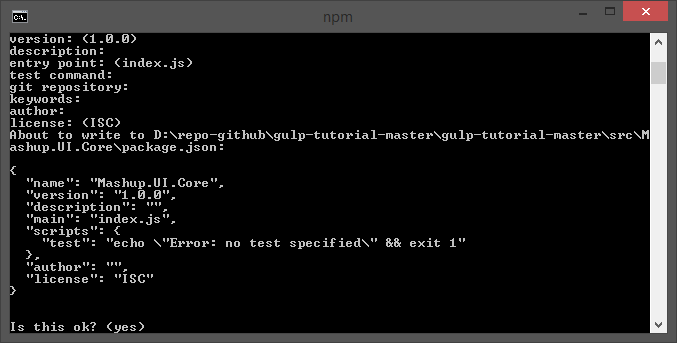
    You will be prompted for several configuration options. For the purposes of this tutorial I’ve skipped these and just pressed Enter for each prompt until complete.


    enter image description here

    And now your package.json is born.

    enter image description here

    For more information about NPM packages
    https://docs.npmjs.com/files/package.json

    Installing NPM packages

    First, let’s install the bower NPM module. We’ll need this to pull client side scripts of which we have many.

    From the command-line

    Npm install bower –g
    

    Retrieve all bower scripts from the command-line

    Bower install
    

    Installing Gulp

    At this point, Gulp can be installed with the following command. Notice the “-g” command. This causes the NPM package to be installed globally.

    Installing Gulp (add “-g” to install globally)

    npm install -g gulp


    Gulp must also be installed locally for your project. The global install allows you to execute Gulp commands from the command-line by providing a Command-Line Interface or CLI. The local Gulp install is a plug-in to NodeJS and gets access to Gulp plugins via NPM.

     Npm install gulp --save-dev


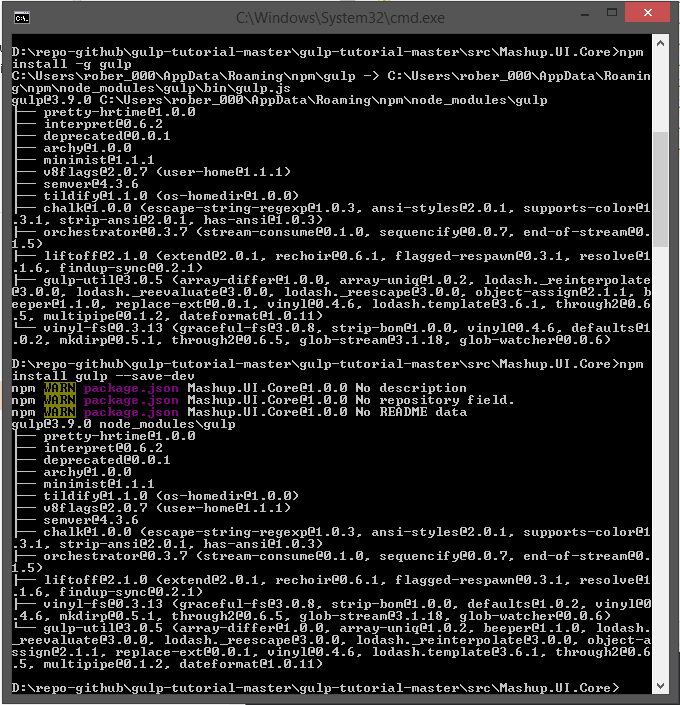
    If you’re new to NPM, then just know that a screen that looks like this is completely normal.

    enter image description here

    TIP: Visual Studio Code

    Often I want to view a file without having to open an entire Integrated Development Environment like Visual Studio .NET. It’s just way more than I need to quickly view a file and in fact, often you can’t quickly view a file because VS .NET is so big.

    Download and install Visual Studio Code. You can use programs like Notepad++ or Sublime as well.

    In this case we just installed Gulp globally and locally. This tutorial is a learning tool so in the spirit of learning, each time I perform an action I’m going to poke around and see what changed. After installing Gulp I want to see what has changed.

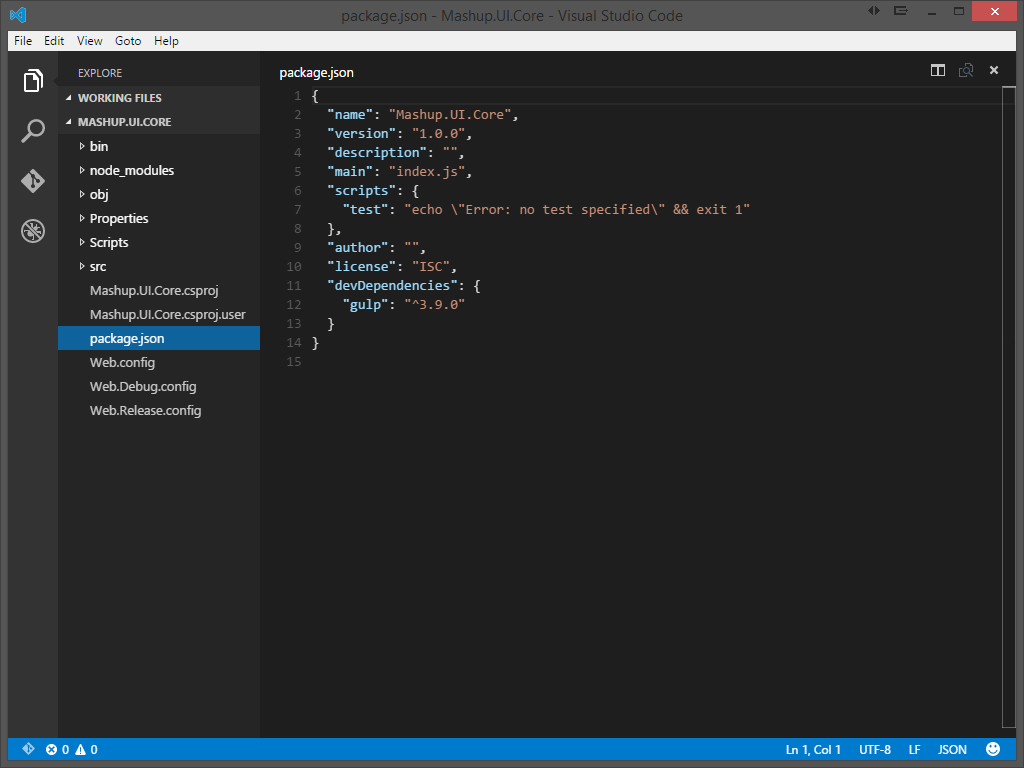
    Right click the package.json file and open it with your favorite code editor and see the change.


    enter image description here

    Package.json stores its information as JSON. Notice the first several attributes. These are the values we opted to provide, or, in my case, not provide.

    When we applied the “–save-dev” options to the NPM install statement, the config was added to the “devDependencies” section.

    The package.json file is a part of your code base and should be included/checked-in to source control. The “node_modules” folder created by NPM should not be checked in to source control.

    When setting up the development environment on a new machine, simply open a command-line to the folder where package.json resides and type:

    npm install
    

    Or

    npm update


    NPM will then go download and install all the packages specified in the package.json.

    For more information on installing NPM packages
    https://docs.npmjs.com/getting-started/installing-npm-packages-locally

    Creating the gulpfile.json

    Create a text file named gulpfile.js with the following content, in the root of your project. Add the following scaffolding to the new gulpfile.js file.

    var gulp = require('gulp');
        gulp.task('default', function() {
        // place code for your default task here
    });


    enter image description here

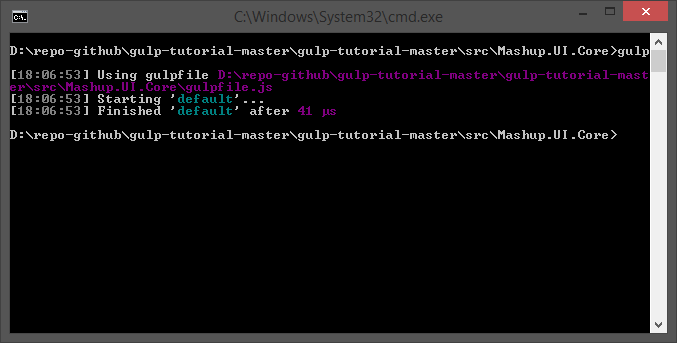
    At this point you can execute Gulp from the command-line. There are no tasks in the “default” task, but Gulp will run.

    At the command-line type “gulp” and press enter.

    gulp


    enter image description here


    Source code for this tutorial

    Start the tutorial using this code base:

    https://github.com/MashupJS/gulp-tutorial


    A completed tutorial can be found here:

    https://github.com/MashupJS/gulp-tutorial-end-result


    Smiley face

    This tutorial and more can be found in
    Gulp - Quick guide to getting up and running today

    http://robertdunaway.github.io

    http://mashupjs.github.io

    The Mashup is a learning tool that serves as a seed project for line-of-business applications. It’s goal is a shortened learning curve for building modern business applications and the reduction of technical debt.

    Smiley face

    This tutorial and more can be found in
    Gulp - Quick guide to getting up and running today

    Gulp Tutorial - Part 1

    Reasons for build tools like Gulp

    PRODUCTIVITY

    The reason for a build system is always productivity. Otherwise we wouldn’t invest time in it.
    Build systems perform housecleaning work, allowing you to focus on code. Before build systems, if you were lucky, you could right click and select “minify” in your IDE. As lucky as this might have been, minification might not have been worth the additional development effort required. Build systems address this problem.

    Build systems perform tasks with a level of precision humans are incapable of. For Continuous Integration and Continuous Delivery to work, a build system must be used to keep the human element out. Continuous Delivery requires automation at all levels, including testing, to mitigate common deployment defects.

    There are thousands of plugins to perform just about any task imaginable. Here are a few.


    Performance/Optimization

    • Minification of JavaScript files
    • Minification of CSS files
    • Slimming down CSS classes that are not used
    • Concatenating many JavaScript files to reduce get requests
    • Creation of MAP files for debugging at run-time


    Deployment

    • Files can be optimized then copied to a folder to isolate deployment from development
    • A zip file can be generated for deployment
    • Automated tests can be executed
    • Deployments can be created with a particular purpose; e.g., an app can be built for mobile.


    Static analysis

    • Linters can be executed against your code producing advice
    • Cyclomatic complexity and other measures can be generated.


    Documentation

    • Documentation can be generated from code into readable formats.
    • HTML documents can be generated from Markdown, a popular text format.


    Additional resources

    https://www.youtube.com/watch?v=XJ5F-Auhato


    Source code for this tutorial

    Start the tutorial using this code base:

    https://github.com/MashupJS/gulp-tutorial


    A completed tutorial can be found here:

    https://github.com/MashupJS/gulp-tutorial-end-result


    Smiley face

    This tutorial and more can be found in
    Gulp - Quick guide to getting up and running today

    http://robertdunaway.github.io

    http://mashupjs.github.io

    The Mashup is a learning tool that also serves as a bootstrap project for line-of-business applications.

    Mashup Applications

    One of the functions of the Mashup is allowing you to build new applications without having to build the plumbing again. Core features and libraries are available to all Mashup applications.


    The apps directory is for your applications. After installing the Mashup you’ll have a couple starter apps as a map for how to create your own.


    Placing your application in the Apps folder and using a few conventions makes integrating apps into the Mashup seamless.

    Routing

    route.config.js


    Route configurations placed in this file are combined by Grunt/Gulp and loaded at run-time.


    This approach makes it possible to drop in or remove applications without having to fiddle with routing. Each app is 100% self-contained and can be moved easily between MashupJS implementations.

    menu.config.js


    Describes the intended menu structure in JSON. The menu structure can be static or you can create a process that dynamically generates it based on user roles/rights.


    This file is concatenated with other menu.config.js files and load at run-time.

    AuthN/AuthR

    An example of a basic authentication method is implemented in the [root]/apps/mashup.


    Each application is responsible for its own security but each application can subscribe to the user session of another application. It’s likely, in companies using AD, only one session is created from which app applications derive authentication and authorization properties.


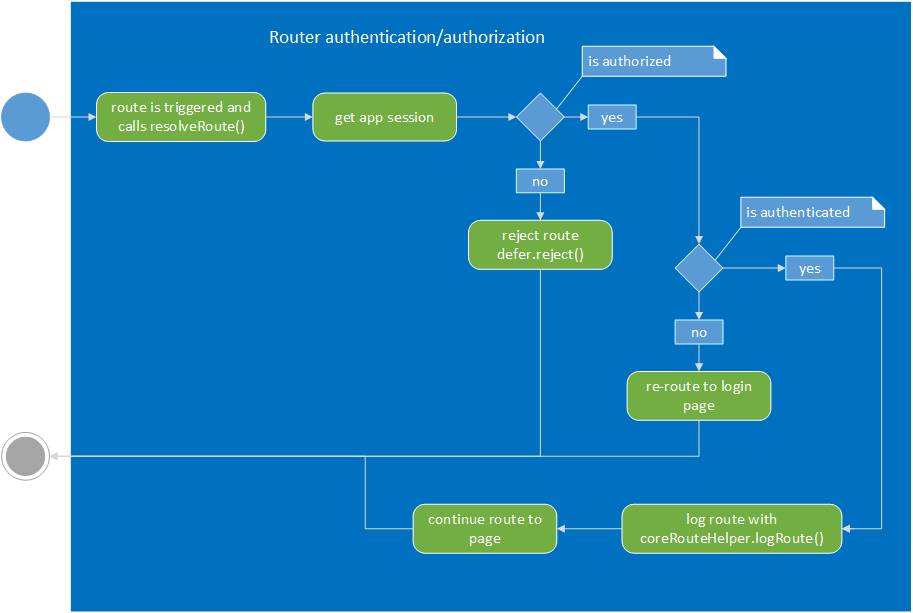
    Authentication and authorization are performed in the route configuration using “resolve”.

    Example:

    mashupApp.config(['$routeProvider', function ($routeProvider) {
        $routeProvider.otherwise({ redirectTo: '/mashup' });
        $routeProvider
        .when('/mashup/about', {
            templateUrl: 'apps/mashup/about.html',
            controller: 'mashup.AboutController',
            controllerAs: 'vm',
            resolve: {
                loadMyCtrl: ['$ocLazyLoad', function ($ocLazyLoad) {
    // you can lazy load files for an existing module
    return $ocLazyLoad.load({
        name: 'mashupApp',
        files: ['apps/mashup/about.controller.min.js']
    });
                }],
                resolveRoute: ['$route', 'mashupRouterAuth', function ($route, mashupRouterAuth) {
    return mashupRouterAuth.resolveRoute(['Administrator']);
                }],
            }
        })


    The “resolveRoute:” function is executed before the route can be resolved. If the user is not authenticated then they can be re-routed to a login page. If the user is not authorized then they can be routed to a page that says they are not authorized.


    The resolveRoute function is injected with the “mashupRouterAuth” which gives access to the “resolveRoute” function. The “mashup” in “mashupRouteAuth” is referring to the name of the app plush “RouterAuth”. You application, if named “accounting”, could be “accountingRouteAuth”.


    You can deviate and improve upon this basic design.

    Sessions

    Each application can have its own session or share. It’s possible that all your applications use one session except for a customer facing application that uses Identity Server 3. The mashup can easily accommodate multiple sessions.


    There are two different types of session. There is the “sessionService” and an application’s user session.


    The sessionService is for general use by utilities such as the logService. Only a little user information is maintained in the sessionService to let utilities know the user and application that was being used at that moment. When switching to another application within the mashup the user id from that session and its application name are updated within the sessionService.


    The application’s user session is stored in IndexedDB and retrieved by the session name.

    Basic AuthN/AuthR Example:

    (function () {
    
     getAppSession().then(function (data) {
        var appUserSession = data[0];
        var session = _.first(_.where(appUserSession.sessions, { 'appName': 'coreSession' }));
    
        var isAuthenticated = isUserAuthenticated(session);
        var isAuthorized = isUserAuthorized(session, authGroupArray);
    
        if (!isAuthorized) {
            // Just kill the page change completely.
            defer.reject();
        }
    
        if (!isAuthenticated) {
            // HERE YOU CAN SET $location.path('/login') to force authentication.
            $location.path('/mashup/login');
        }
        else {
            session.sessionLastUsed = utility.localMilToUtcMil(new Date().getTime());
        }
    
        coreRouteHelper.logRoute('mashup');
        defer.resolve(true);
    
      });
    
    })();
    
      return defer.promise;
    };
    
    var getAppSession = function () {
      return cacheService.getCache('mashupSessions');
    };


    enter image description here


    JavaScript Loading Options

    Depending on your development and delivery workflow there are multiple approaches to optimizing and building your solution.


    - Use Grunt/Gulp to create one file for each page Lazy load each JS as needed.
    - Use Grunt/Gulp to create one file per application.
    - Use Grunt/Gulp to create one file for the entire mashup and apps.
    - Initial load time versus deep linking.
    - You can optimize the initial load of the first page but when users can deep link into any place in the application the quick initial load is lost. The option I’ve chose is lazy loading components needed for any page via the router. This gives us a fairly quick deep linking load time.
    - These are line-of-business applications that are used repeatedly. Once the application has loaded once the follow up loads should pull scripts from cache.

    apps/mashup

    Welcome Page – just a landing page.

    About Page

    Displays all sessions with one tab per session and the session in the form of JSON. You’re about page will have a more custom display of user session information.


    The About page also displays what is currently cached for fast data retrieval.

    Login Page

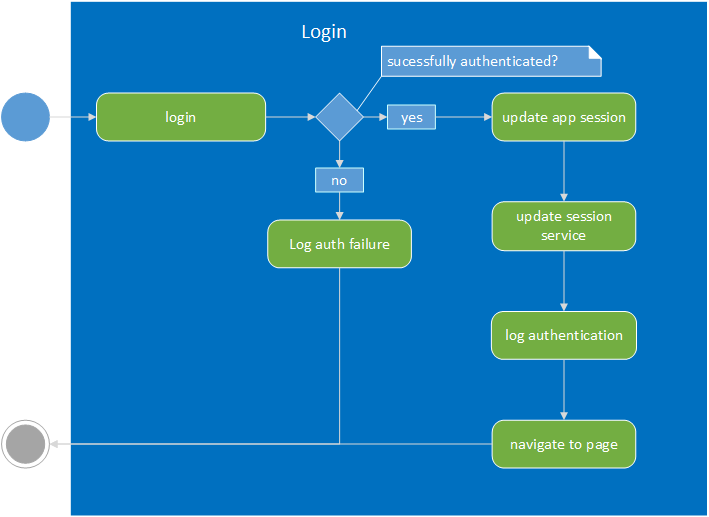
    The login page demonstrates a basic way to get and store authentication information as a user session.


    enter image description here

    http://robertdunaway.github.io

    http://mashupjs.github.io

    The Mashup is a learning tool that also serves as a bootstrap project for line-of-business applications.

    The MashupJS Menu

    Most applications have some type of menu system linking the user to modules within the application. The MashupJS is a composite of many applications so it links the user to multiple applications via its menu system.

    Developers will likely develop their applications in a separate implementation of the MashupJS and copy their applications directory to the deployment MashupJS. For this to work the MashupJS must adopt a “drop-in” approach to adding applications.

    Using Grunt/Gulp the mashup not only combines routes between multiple applications into a single routing system but pulls and displays application menu items giving the user a unified view of corporate applications.

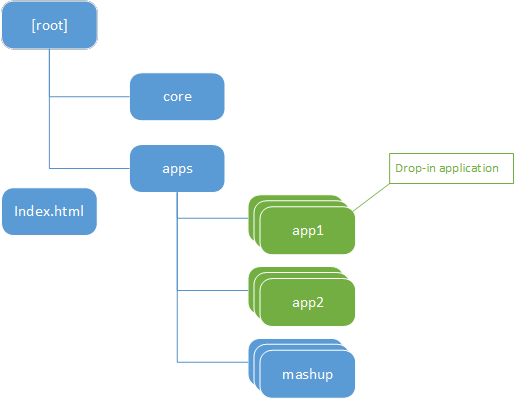
    File Structure for Drop-in Applications

    In the example below app1, app2, and mashup all have items for the mashup menu.
    enter image description here


    MashupJS menu items are stored in a JSON file with the name “menu.json.txt”.


    NOTE: Notice the “.txt” extension of the JSON file.  IIS is initially set up to understand HTML and TXT files but not JSON file.  The mime can be added but for the sake of simplicity I’ve decided to use “txt”.


    JSON Merge

    Using a task manager, such as Grunt/Gulp, “the menu.json.txt” files from each app is merged into a single “menu.json.txt” file and placed into the “dist” directory.

    A simple Grunt configuration makes this possible.
    https://www.npmjs.com/package/grunt-merge-json

    Installing the Grunt plugin

    npm install grunt-merge-json --save-dev
     
    Loading the Grunt module

    grunt.loadNpmTasks('grunt-merge-json');
    Grunt configuration
    "merge-json": {
        menu: {
        src: ['apps/**/menu.json.txt'],
        dest: '<%= distFolder %>/menu.json.txt',
        },
    },
     

    Boiler plate pages

    The Mashup’s core does not have its own UI controls or pages. One of the drop-in applications in the “apps” directory must host your menu and menu logic. The “apps/mashup” application starts with a couple boilerplate pages.

    The “apps/mashup” should be replaces by your company’s boiler plate pages.
    welcome.html
    • A basic welcome page.
    login.html
    • Each mashup app can have its own login.html page or share a common corporate login page.
    about.html
    • Provides basic information about the users sessions and cached data elements.
    menu.html
    • Provides links between Mashup applications.
    • The menu.controller.js of the application hosting the mashups menu will read and use the new “menu.json.txt”.
    The menu.json data object is basic. This example only contains two levels but there is no limit on the number of levels possible.

    The first level, the root of the JSON object, is the category. Initially the MashupJS has four categories but yours may different in number and name.

    The four initial categories are:

    Applications

    Applications you build will likely have at least one menu item in the Application category.
    Utilities
    • Often we are required to build simple utility screens that aren’t large enough to be considered an applications. These can be organized in the Utilities category.
      Administrative
    • Place to put basic user and application management pages.
    Examples
    • The MashupJS is a learning application. Code examples can be embedded into the MashupJS but hidden from users. Another option is to simply have another implementation of the MashupJS just for developers as a Front-End code library.

    Category Attributes

    name – Name of the menu item and what will be displayed on the item

    id – The id of the menu item created.

    isOpen – Indicator of whether the category is open or closed.

    icon – A class representing a Font Awesome icon.

    session – The name of the users session used to determine if the user has access to the menu item.

    role – The role required by the session to determine menu item access.

    groups – List of controls to be created in the category.

    Menu Item Attributes are similar to those of the Category Attributes with the exception of “isOpen”. Menu items that line to applications are not in an open or closes state.

    In addition to the attributes similar to Category are the following:

    Desc – This is a longer description of the menu item. Display of this depends on your applications needs and what resolution your responsive interface is loaded into.

    url – The link created when the menu item is pressed.

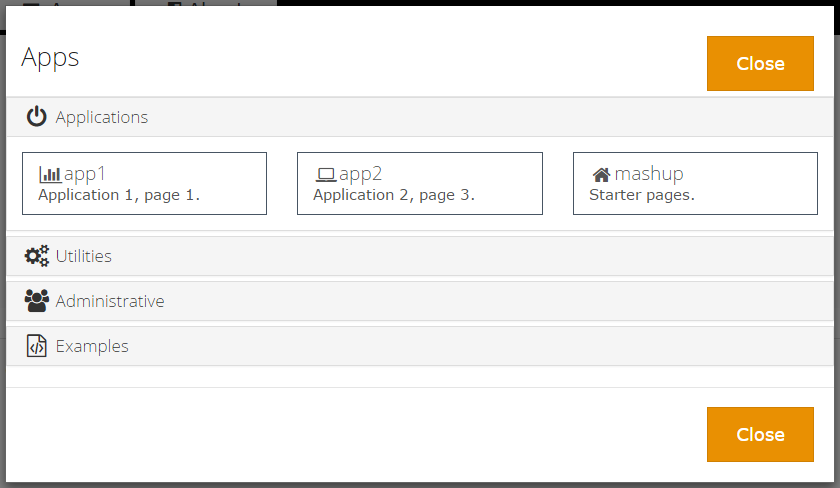
    Example of the “apps/app1” menu. This is combined with the menus from “apps/app2” and “apps\mashup” to form the final menu.json file uses by the menu system.


     [
        {
            "name": "Applications",
            "id": "catApps",
            "isOpen": "true",
            "icon": " fa-power-off ",
            "session": "coreSession",
            "role": "MashupUser",
            "groups": [
                {
                    "name": "app1",
                    "id": "menuItemApp1",
                    "desc": "Application 1, page 1.",
                    "url": "/app1/page1",
                    "icon": " fa-bar-chart ",
                    "session": "coreSession",
                    "role": "MashupUser"
                }
            ]
        },
        {
            "name": "Utilities",
            "id": "catUtilities",
            "isOpen": "false",
            "icon": " fa-cogs ",
            "session": "coreSession",
            "role": "MashupUser",
            "groups": [ ]
        },
        {
            "name": "Administrative",
            "id": "catAdmin",
            "isOpen": "false",
            "icon": " fa-users",
            "session": "coreSession",
            "role": "MashupUser",
            "groups": [ ]
        },
        {
            "name": "Examples",
            "id": "catExamples",
            "isOpen": "false",
            "icon": " fa-file-code-o ",
            "session": "coreSession",
            "role": "MashupUser",
            "groups": [ ]
        }
    ]
    The menu.html uses a simple ng-repeater to build the menu and the menu item attributes to set properties and css classes.
    <div class="panel-group" id="dynamicMenu">
        <div class="panel panel-default" ng-repeat="category in menuJson">
            <div class="panel-heading">
                <h4 class="panel-title">
                    <a data-toggle="collapse" data-parent="#dynamicMenu" data-target="#collapse{{category.name}}">
                        <i class="fa fa-lg fa-fw {{category.icon}}"></i> {{category.name}}
                    </a>
                </h4>
            </div>
            <div id="collapse{{category.name}}" class="panel-collapse collapse" ng-class="{ 'in': $first }">
                <div class="panel-body" ng-click="close()">
    
                    <div class="row">
    
                        <div class="col-sm-4" ng-repeat="menuitem in category.groups">
                            <a href="#{{menuitem.url}}" class="list-group-item vp-menu-btn">
                                <i class="fa fa-lg fa-fw {{menuitem.icon}}"></i><span class="h4">{{menuitem.name}}</span>
                                <p class="list-group-item-text">{{menuitem.desc}}</p>
                            </a>
                        </div>
                    </div>
                </div>
            </div>
        </div>
    </div>

    Responsive Design

    The menu is responsive. You’ll likely replace this with a Bootstrap menu or some other menu of your choosing.

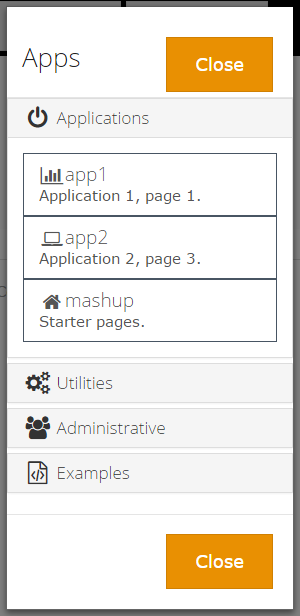
    enter image description here
    enter image description here